

Table of Contents
Tired of complicated weeknight dinners that leave you with a sink full of dishes?
Let me introduce you to your new best friend: this One-Pot Lemon Herb Chicken and Rice that’s about to revolutionize your dinner game. We’re talking juicy, golden-brown chicken nestled on a bed of fluffy, lemon-infused rice, all cooked together in a single pan.
The best part? This Easy Lemon Herb Chicken Recipe comes together in just 30 minutes, and cleanup is a breeze. After making this for the hundredth time (yes, really!), I’ve perfected every detail to ensure you get restaurant-quality results right in your own kitchen. My readers consistently tell me it’s become their go-to meal when they want something impressive without the fuss.
Why You’ll Love This Recipe
Here’s what makes this Lemon Herb Chicken and Rice absolutely irresistible:
- One-Pot Wonder: Everything cooks in a single pan for easy cleanup
- Ready in 30 Minutes: Perfect for busy weeknights when time is tight
- Incredibly Flavorful: Bright lemon, savory herbs, and juicy chicken create magic
- Family-Friendly: Even my pickiest eaters ask for seconds
- Customizable: Easily adapt with different herbs or vegetables
Ingredients You’ll Need
For the Chicken:
- 4 boneless, skinless chicken thighs (about 1.5 lbs)
- 2 tablespoons olive oil
- 1 teaspoon salt
- ½ teaspoon black pepper
- 1 teaspoon garlic powder
- 1 teaspoon dried oregano
For the Rice:
- 1½ cups long-grain white rice
- 2½ cups low-sodium chicken broth
- 1 large lemon (zested and juiced)
- 3 cloves garlic, minced
- 2 tablespoons butter
- ¼ cup fresh parsley, chopped
- 2 tablespoons fresh thyme (or 1 tablespoon dried)
Ingredient Notes:
Chicken: While I prefer boneless, skinless chicken thighs for their juiciness, you can absolutely use chicken breasts. Just know that thighs are more forgiving and stay tender even if you cook them a minute too long.
Rice: Long-grain white rice is your best bet here. It maintains the perfect texture without getting mushy. Short-grain rice tends to become too sticky for this dish.
Herbs: Fresh herbs really make this dish sing! But don’t worry if you only have dried – just use half the amount. Parsley, thyme, and oregano are my go-to trio, but rosemary works beautifully too.
Chicken Broth: Always go for low-sodium so you can control the saltiness. Trust me on this one!
Step-by-Step Instructions
Step 1: Prepare and Season the Chicken Pat the chicken completely dry with paper towels – this is crucial for getting that golden crust. Season both sides generously with salt, pepper, garlic powder, and oregano. Pro-Tip: Let the seasoned chicken sit for 5 minutes while you prep other ingredients. This helps the seasoning stick better.
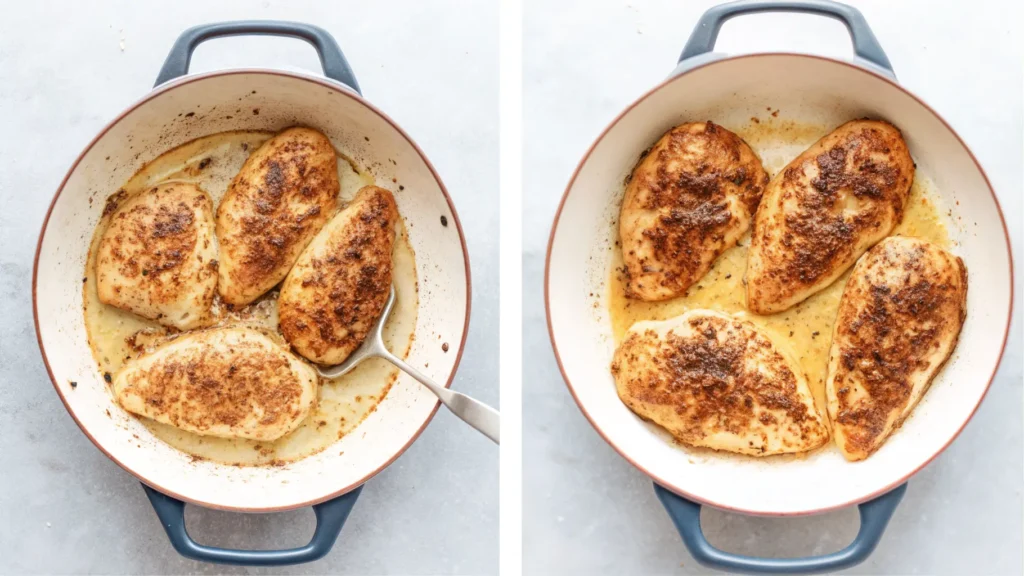
Step 2: Sear the Chicken Heat olive oil in a large, deep skillet or Dutch oven over medium-high heat. Sear the chicken for 4-5 minutes per side until golden brown. Don’t move it around – let it develop that beautiful crust! Remove chicken to a plate and set aside. Pro-Tip: Don’t overcrowd the pan. Work in batches if needed for the best sear.
Step 3: Sauté Aromatics and Toast the Rice In the same pan (don’t clean it!), melt the butter. Add minced garlic and sauté for 30 seconds until fragrant. Add the rice and toast for about a minute, stirring constantly. This extra step adds incredible nutty flavor to your rice.
Step 4: Deglaze and Add Liquids Pour in the chicken broth and lemon juice, scraping up all those browned bits from the bottom of the pan. That’s pure flavor gold right there! Add the lemon zest and half of your fresh herbs. Bring the mixture to a simmer.
Step 5: Simmer and Cook Nestle the chicken back into the pan, placing it on top of the rice. Reduce heat to low, cover tightly with a lid, and let it simmer for 18-20 minutes. Resist the urge to peek – keeping that lid on ensures perfectly steamed rice!
Step 6: Rest and Finish Turn off the heat and let it rest for 5 minutes with the lid on. This allows the rice to absorb any remaining liquid. Sprinkle with remaining fresh herbs and an extra squeeze of lemon if you like.
Tips for the Perfect Lemon Herb Chicken and Rice
Want to nail this One-Pot Lemon Herb Chicken and Rice every single time? Here are my tried-and-true secrets:
Don’t Skip the Sear: I know it’s tempting to just throw everything together, but searing locks in those juices and creates incredible flavor. That golden crust isn’t just for looks!
Use Fresh Lemon: Please, please use fresh lemon juice! The brightness it brings is miles ahead of the bottled stuff. One large lemon should give you about 3-4 tablespoons of juice.
Let It Rest: After cooking, that 5-minute rest with the lid on is non-negotiable. The rice continues to steam and becomes perfectly fluffy during this time.
Fluff with a Fork: Always use a fork, never a spoon, to fluff the rice. A spoon will make it gummy and sad. We want light and fluffy!
Variations and Customizations
One thing I love about this Easy Lemon Herb Chicken Recipe is how versatile it is. Here are some of my favorite twists:
Add Vegetables: Toss in a handful of baby spinach during the last 2 minutes, or add frozen peas when you return the chicken to the pan. Diced bell peppers or cherry tomatoes work beautifully too.
Make it Creamy: Stir in a splash of heavy cream or coconut milk at the very end for a rich, creamy version. My kids go crazy for this variation!
Spice It Up: Add a pinch of red pepper flakes or a dash of hot sauce for those who like it spicy. Sometimes I add a teaspoon of smoked paprika for a subtle smoky flavor.
Different Grains: You can use brown rice or quinoa, but you’ll need to adjust the liquid (add ½ cup more) and cooking time (add 10-15 minutes).

Serving and Storage
What to Serve With:
While this Lemon Herb Chicken and Rice is a complete meal on its own, I love pairing it with a simple green salad dressed with lemon vinaigrette. Roasted broccoli or steamed asparagus make excellent sides too. Sometimes I’ll serve it with warm pita bread to soak up those delicious pan juices.
Storage and Reheating:
Store leftovers in an airtight container in the refrigerator for up to 3 days. To reheat, add a splash of water or chicken broth and microwave in 30-second intervals, stirring between each. You can also reheat it on the stovetop over low heat with a bit of liquid.
Frequently Asked Questions
Can I use chicken breasts instead of thighs? Absolutely! Just reduce the cooking time by about 2-3 minutes since breasts cook faster. Make sure they reach an internal temperature of 165°F.
Can I use brown rice? Yes, but you’ll need to increase the liquid to 3 cups and extend the cooking time to 35-40 minutes. Brown rice takes longer to become tender.
Is this recipe gluten-free? Yes! As long as you use gluten-free chicken broth, this dish is naturally gluten-free. Always check your broth label to be sure.
Can I make this ahead of time? While it’s best fresh, you can prep all ingredients ahead. Season the chicken and store it covered in the fridge. Measure out your rice and liquids. When ready, just follow the cooking steps!
What are the best herbs to use? Fresh parsley and thyme are my favorites, but oregano, basil, and dill all work wonderfully. In winter, I love adding rosemary for a heartier flavor profile.
Final Thoughts
This One-Pot Lemon Herb Chicken and Rice has become such a staple in my kitchen that I make it at least twice a month. There’s something magical about how simple ingredients transform into such a flavorful, satisfying meal with minimal effort.
The bright lemon cuts through the richness of the chicken, while the herbs add layers of flavor that make every bite interesting. And honestly? The fact that I only have one pan to wash makes this recipe a true winner in my book.
Have you tried making this yet? I’d love to hear about your variations or any tweaks you’ve made to make it your own. Drop a comment below and let’s chat about our favorite one-pot wonders!